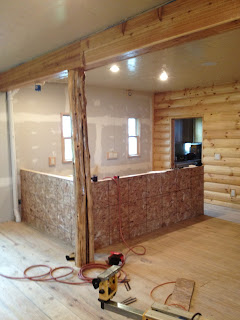
How we built the bar in the Grand Lodge at Rolling Plains Adventures.
Step one: We used 2 x 4 's to construct the main frame that the bar will sit on. Generally you would use 2 x 6 or 2 x 8, but it will be attached to the wall and have additional support, so we went for added space with the 2 x 4's.
Step 2: We added 1/2 inch board to support the frame. This will aid in anchoring the wood slabs down if they are warped at all.
Step 3: We then used 2 inch thick pine log siding to the fronts of both sides of the bar. This also will give the bar added durability.
Step 4: Make sure everything is level and sound before you add the wood slabs on top. Be sure to use plenty of hardware to anchor the walls down to the floor. In our layout, we had a few obstacles to overcome in the bar. We had to tie the bar into the log supporting the beam. We also had to construct around the drain line.
Step 5: Carefully lay down the 3" thick bar slabs onto the frame. The slabs are joined at the 45 degree angle by liquid nails. We also applied this to the frame. The slab was then anchored from the bottom up with 4 inch lag screws.
Step 6: Be sure to sand the slabs flat and use all grades of sanding paper to get the blemishes out or sand lines. Use a very durable coating over the slabs for heavy prolonged use. We went with a 2 part epoxy finish. Each coat is like 50 coats of urethane. We coated it twice after the initial brushing. Shown above is also a custom opening at the bottom for a sub woofer to sound through.
Once the job is done, we will have many memories for all the pheasant, duck, and deer hunters to tell their stories at. Also the fisherman, ranch vacationers, and all other quests stopping by the watering hole at Rolling Plains Adventures.


No comments:
Post a Comment